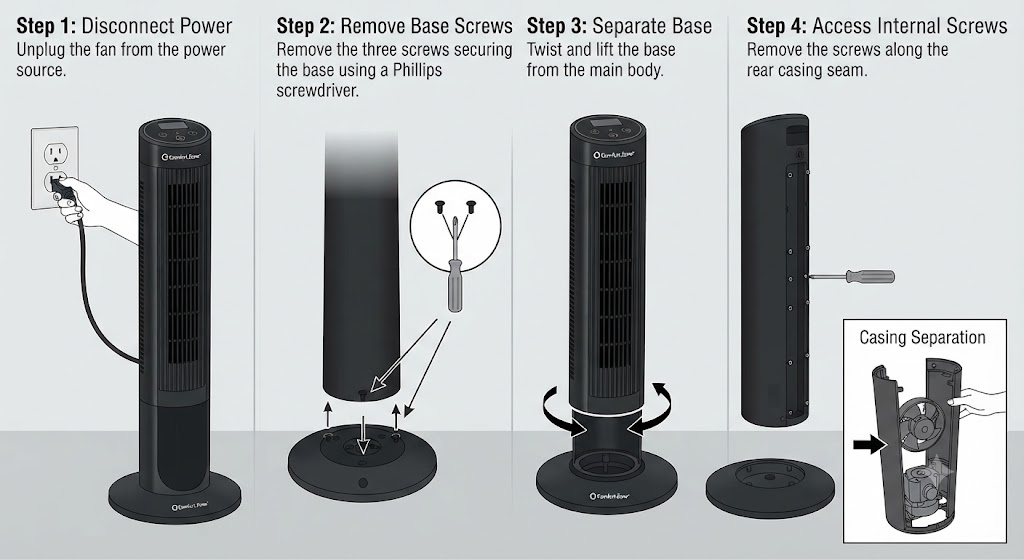
If you are searching for how to open a Comfort Zone tower fan model CZTFR1BK, there is an important distinction to understand before reaching for a screwdriver. Removing the pedestal base is straightforward and documented by Comfort Zone, but separating the main tower housing for internal cleaning or repair is not described as a normal user-maintenance procedure in the manufacturer’s manual.
That does not mean you cannot inspect or clean the fan effectively. It means the job should be approached carefully, with the fan completely disconnected from power and with particular attention paid to plastic clips, concealed screws, wiring, and the oscillation mechanism.
This guide explains how to open a Comfort Zone tower fan model CZTFR1BK as far as can reasonably be done without guessing about undocumented internal fasteners. It also explains when opening the enclosure is unnecessary, how to clean the fan safely, and what to check if weak airflow, dust buildup, rattling, or power problems prompted you to take it apart.
Important: The CZTFR1BK operates from 120V AC, 60 Hz power. Comfort Zone specifically instructs users to unplug the fan before assembling, disassembling, moving, or cleaning it. Never work on the housing while the fan is connected to an outlet.
Understanding the Comfort Zone CZTFR1BK Before Opening It
The CZTFR1BK is the black version of the Comfort Zone CZTFR1 tower fan. The owner’s manual identifies the two versions as CZTFR1 white and CZTFR1BK black.
The fan uses a slim tower configuration with high-performance centrifugal-style blades, three speed settings, oscillation, a timer, and remote operation. Retail listings also identify the CZTFR1BK as a roughly 31-inch oscillating tower fan with electronic controls and a pedestal-style base.
That design matters when learning how to open a Comfort Zone tower fan model CZTFR1BK. Unlike a conventional desk fan, you do not simply remove a round front grille and pull off an exposed propeller. The rotating blower assembly, motor, oscillation hardware, and electrical controls sit inside a tall plastic enclosure.
What the Manufacturer Actually Documents
Comfort Zone provides clear instructions for installing and removing the base. The official procedure shows screws on the underside of the fan, a two-piece pedestal base, a center opening for the power cord, and cord-retaining channels.
The manual does not, however, provide a teardown diagram showing removal of the entire tower shell, motor, control board, or centrifugal blower.
That distinction is critical. Some online disassembly instructions for generic tower fans assume identical clip and screw locations across brands. They are not necessarily identical.
Tools You May Need
For how to open a Comfort Zone tower fan model CZTFR1BK, begin with simple hand tools rather than power tools. Driving screws aggressively into an aging plastic housing is an easy way to strip a boss or crack a mounting point.
Useful items include:
- Phillips screwdriver in a size that fits the screws properly
- Small container or magnetic tray for screws
- Plastic pry tool or old plastic card
- Flashlight
- Soft paintbrush or detailing brush
- Vacuum with a brush attachment
- Microfiber cloth
- Camera or smartphone for documenting wire routing
- Masking tape for labeling screws if multiple lengths are discovered
Avoid knives and large flat-head screwdrivers for separating plastic seams. Their concentrated force can leave permanent marks or break tabs.
Compressed air can sometimes help remove loose dust, but uncontrolled high-pressure air may simply drive debris deeper into the motor or electronics. A vacuum and soft brush generally provide more controlled cleaning.
Safety Steps Before You Start
Before attempting how to open a Comfort Zone tower fan model CZTFR1BK, switch the fan off and physically unplug it from the wall. Do not rely exclusively on the control-panel power button.
Comfort Zone’s safety instructions warn against operating a fan with damaged components, inserting objects into its openings, using it around water, or servicing it while connected to power. The company also says not to operate the fan with safety devices or guards removed.
Give the motor time to stop completely before handling the unit.
You should also work on a clean, flat, dry surface with enough space to lay the fan down without pressing heavily on the control panel.
Before Disassembly, Check the Warranty Situation
If the fan is relatively new and has developed an electrical or mechanical failure, opening its main enclosure may not be the smartest first step.
Comfort Zone documentation for this model specifies a limited warranty, while an older CZTFR1 manual states that products modified outside the factory may be excluded from coverage.
When the problem appears to be an actual product defect rather than dust buildup, contacting the manufacturer or retailer first may preserve your repair options.
How to Open a Comfort Zone Tower Fan Model CZTFR1BK Step by Step
Here is the safest sequence to follow. The first portion is directly supported by the manufacturer’s assembly diagram. Once you reach the main enclosure, proceed conservatively because Comfort Zone does not publish a complete shell-disassembly procedure for the CZTFR1BK.
Step 1: Disconnect the Fan From Power
Unplug it directly from the receptacle.
Do not pull the plug out by yanking the cable. Comfort Zone gives the same general precaution when describing access to the integrated fuse in the plug.
Wait until all moving parts have stopped.
Step 2: Place the Fan on a Protected Surface
Put a towel or soft mat on your workbench or floor.
Carefully position the fan so you can reach the underside without loading its weight onto fragile grille sections or control buttons.
Photograph the fan before taking anything apart. A few pictures can save considerable confusion during reassembly.
Step 3: Remove the Base Screws
This is the first manufacturer-documented stage of how to open a Comfort Zone tower fan model CZTFR1BK.
Comfort Zone’s assembly instructions show screws installed into the underside of the tower. During initial assembly, these screws are removed, the base is positioned, and the screws are reinstalled through the pedestal into the bottom of the fan.
To reverse that procedure:
- Locate the base-to-tower screws.
- Hold the tower securely.
- Remove each screw using the correctly sized screwdriver.
- Put every screw in a container.
- Avoid pulling the base away until all fasteners are confirmed removed.
Do not assume that resistance means another part should be forced.
Step 4: Release the Power Cord From the Base
The power cord passes through the center area of the two-piece base and is routed through molded cord holders. The manufacturer’s Fig. 4 specifically illustrates this cord-management arrangement.
Gently free the cord from those holders.
Do not twist, pinch, or sharply bend it.
Step 5: Separate the Two Base Sections if Necessary
The CZTFR1BK pedestal consists of two sections that join around the power cord during initial assembly.
Reverse the process carefully.
Once separated, set both pieces aside together with their mounting screws.
At this point, you have completed the part of how to open a Comfort Zone tower fan model CZTFR1BK that is explicitly documented by Comfort Zone.
Opening the Main Tower Housing
This is where caution becomes much more important.
The available CZTFR1/CZTFR1BK owner’s documentation does not provide an exploded diagram or official step sequence for separating the entire outer housing. Instead, its maintenance section concentrates on cleaning the grille externally and using a vacuum periodically.
For that reason, do not copy the screw positions from an unrelated Lasko, Honeywell, Mainstays, or other Comfort Zone tower-fan model.
Step 6: Inspect the Entire Rear Housing
Place the fan so the rear is visible under good lighting.
Look carefully for actual fasteners on your unit. They may be visible directly or positioned around structural areas such as the rear shell, lower enclosure, handle region, or panel junctions.
Only remove a screw when you can clearly determine that it joins the two housing sections.
Take a photograph before each group of screws is removed.
Step 7: Check for Different Screw Lengths
Do not throw all unidentified screws into one pile.
If your fan uses different screw lengths, reinstalling a long screw into a shallow plastic boss could potentially damage the enclosure.
A simple trick works well: place the screws on a sheet of paper and draw a rough outline showing where each one came from.
Step 8: Test the Housing Seam Gently
After removing every confirmed housing fastener, lightly test the shell around its seams with your fingers.
Do not immediately insert a screwdriver and twist.
If the enclosure still feels solidly locked in one particular location, stop. That usually means either:
- a screw remains installed,
- a molded clip is still engaged,
- another component overlaps the housing, or
- the section is not intended to separate from that direction.
This is one of the most important principles when learning how to open a Comfort Zone tower fan model CZTFR1BK: resistance is information.
Plastic should not require violent force to separate.
Step 9: Use a Plastic Pry Tool Only Where Necessary
When all visible fasteners have been accounted for, a thin plastic opening tool can be used along a genuine enclosure seam.
Apply minimal pressure.
Move gradually around the seam rather than forcing a single spot until it pops. Older ABS plastic can become brittle after years of heat, sunlight, and vibration.
Step 10: Open the Shell Slowly
Even when a shell section appears free, do not yank it away.
Wires may connect the control panel, motor, timer circuitry, or other components to sections of the housing.
Open the panel just far enough to inspect behind it.
If wiring limits movement, photograph the wiring arrangement before touching anything.
What You Will Find Inside a Tower Fan
Understanding the basic architecture makes how to open a Comfort Zone tower fan model CZTFR1BK much less intimidating.
The CZTFR1BK is advertised as using centrifugal blades, rather than the large exposed propeller associated with a traditional pedestal fan.
Inside a tower fan of this configuration, the blower assembly typically occupies a large portion of the vertical enclosure. Air is drawn through intake openings and expelled through the vertical outlet grille.
You may also encounter the motor, wiring harnesses, control electronics, and lower oscillation hardware.
Do not disconnect these parts merely because they are accessible.
How to Clean the CZTFR1BK After Opening It
Interestingly, complete disassembly may not be necessary for ordinary maintenance.
Comfort Zone’s own CZTFR1/CZTFR1BK maintenance guidance says to disconnect the power cord, clean the grille with a clean damp cloth, avoid harsh or abrasive chemicals, never immerse the fan or wiring, and periodically clean the grille with a vacuum. The documentation also stresses allowing the fan to dry completely before operation.
Cleaning the Grilles
Start here.
Use a vacuum with a brush attachment to remove accumulated lint from the intake and exhaust openings.
Then use a soft dry brush to loosen material trapped between narrow grille sections.
Cleaning the Internal Blower
If you have legitimately gained access to the blower without disturbing electrical parts, use a soft brush and gentle vacuuming.
Rotate nothing aggressively.
A tower blower can accumulate surprisingly uneven dust deposits. Removing them can improve airflow and potentially reduce imbalance-related vibration.
Cleaning Around the Motor
Be conservative.
Do not soak the motor, spray cleaner into it, or flood it with lubricant.
The goal is simply to remove loose dust around ventilation areas without disturbing wiring or bearings.
Never Wash the Fan Interior
Comfort Zone explicitly states not to immerse the fan or wires in water.
The same reasoning applies to spraying household cleaner directly into the enclosure.
Apply any suitable cleaner to the cloth—not directly into the appliance—and keep liquid away from electrical components.
Why You Might Want to Open the CZTFR1BK
People researching how to open a Comfort Zone tower fan model CZTFR1BK are usually dealing with one of several symptoms.
Weak Airflow
Dust on the intake grille and internal blower restricts airflow.
Before performing a full teardown, vacuum both intake and outlet areas thoroughly. The manufacturer’s maintenance instructions specifically recommend periodic grille vacuuming.
If airflow improves, deeper disassembly may be unnecessary.
Rattling or Buzzing
A rattle can come from debris, a loose exterior component, a damaged plastic tab, or internal mechanical hardware.
Run the fan only when it is fully reassembled and safe to operate, then determine whether the noise changes during oscillation.
A noise that appears only while oscillating may point toward the oscillation system rather than the main blower.
Fan Does Not Power On
Opening the tower should not be the first response to a completely dead CZTFR1BK.
The model uses an integrated fused plug, and Comfort Zone provides a specific fuse-inspection and replacement procedure. The documentation describes sliding open the fuse-access cover and replacing a failed fuse only with the specified equivalent rating.
Check the outlet and plug fuse before dismantling the body.
Fan Works but Does Not Oscillate
The CZTFR1BK has an electronically controlled swing function. Comfort Zone specifies that pressing the SWING control activates side-to-side movement while the fan is operating.
If airflow remains normal but oscillation has stopped, the issue could involve the oscillation mechanism or its control rather than the blower.
This type of fault can require more advanced electrical or mechanical diagnosis.
Common Mistakes When Opening the CZTFR1BK
A good guide to how to open a Comfort Zone tower fan model CZTFR1BK should explain what not to do as clearly as what to do.
The most common errors include:
- Working while the fan is plugged in
- Guessing that every tower fan has identical hidden screws
- Forcing plastic seams before finding all fasteners
- Mixing screws of different lengths
- Pulling the casing away without checking for attached wires
- Spraying cleaner directly onto the motor or electronics
- Running the fan with the housing or grille removed
- Forgetting the original power-cord routing
- Pinching the cord when reinstalling the pedestal
- Continuing a repair despite visibly burned electrical components
Comfort Zone specifically warns users against operating the fan with a damaged cord or plug, with damaged safety components, or with ventilation openings obstructed.
Reassembling the Comfort Zone CZTFR1BK
Reassembly should essentially reverse your disassembly sequence.
Start by confirming that no tools, loose screws, cloth fibers, or debris remain inside.
Make sure all wiring occupies its original routing path and is clear of rotating or oscillating components.
Close the Housing Without Forcing It
Align both shell sections carefully.
If they refuse to sit flush, do not squeeze them together using screw pressure. Something may be caught between the panels or a clip may be misaligned.
Engage clips gently before installing screws.
Reinstall Housing Screws
Return every fastener to its original location.
Tighten until secure, but remember that the threads often engage plastic. Excessive torque can strip plastic mounting bosses.
Reinstall the Pedestal
The manufacturer’s assembly diagram makes this portion straightforward.
Join the two base pieces around the cord, place the assembled base against the bottom of the tower, align the mounting holes, reinstall the saved screws, and route the cable through the molded holders.
The finished fan should stand upright and stable without rocking.
Test the Fan After Reassembly
Once how to open a Comfort Zone tower fan model CZTFR1BK has been followed and the machine is completely closed again, perform a cautious test.
Place it on a smooth, stable, level surface, which is also what Comfort Zone recommends for normal operation.
Start with the lowest speed.
Listen for scraping, clicking, rubbing, or abnormal vibration.
Then test:
- Speed 1
- Speed 2
- Speed 3
- Oscillation
- Timer controls
- Remote operation
The CZTFR1BK supports three speeds, timer functionality, oscillation, and remote control according to Comfort Zone’s documentation.
If something begins rubbing internally, disconnect the fan immediately rather than allowing it to “wear in.”
When You Should Stop the DIY Repair
Knowing how to open a Comfort Zone tower fan model CZTFR1BK does not mean every fault should be repaired at home.
Stop if you find:
- melted wiring,
- charred connectors,
- damaged power-cord insulation,
- signs of overheating,
- cracked electrical components,
- damaged motor windings,
- exposed conductors,
- severe mechanical damage, or
- a problem you cannot confidently identify.
Electrical repairs carry much greater risk than ordinary dust removal.
Comfort Zone’s manual specifically warns about shock and fire hazards and directs users not to operate a unit with a damaged cord, plug, or obvious physical defect.
A Better Maintenance Strategy Than Frequent Disassembly
You should not need to learn how to open a Comfort Zone tower fan model CZTFR1BK every few months.
Routine external cleaning can dramatically reduce internal accumulation.
Vacuum the grille periodically, especially if the fan operates around pets, carpet, bedding, open windows, or other sources of lint.
Keep both intake and outlet areas unobstructed. Comfort Zone warns against blocking the fan’s ventilation and exhaust openings.
A few minutes of preventative cleaning is preferable to repeatedly separating aging plastic clips.
FAQ About Opening the Comfort Zone CZTFR1BK
1. How do I take the base off a Comfort Zone CZTFR1BK tower fan?
Unplug the fan first. Remove the screws securing the pedestal to the underside of the tower, carefully free the power cord from its holders, and separate the two base sections if required.
This is essentially the reverse of Comfort Zone’s documented assembly procedure.
2. Does the Comfort Zone CZTFR1BK manual explain how to open the entire fan?
No complete enclosure teardown procedure appears in the available CZTFR1/CZTFR1BK owner’s documentation.
The manual explains base assembly, fan operation, fuse servicing, cleaning, maintenance, and safety precautions, but it does not provide a detailed exploded-view procedure for separating the main tower housing.
That is why any deeper instructions for how to open a Comfort Zone tower fan model CZTFR1BK should avoid claiming undocumented screw or clip locations as universally correct.
3. Do I need to open my CZTFR1BK just to clean it?
Usually not.
Comfort Zone recommends cleaning the grille with a damp cloth and periodically vacuuming it. The manufacturer specifically instructs users to unplug the fan beforehand, avoid harsh cleaners, keep the appliance and wiring out of water, and allow everything to dry before operation.
Try thorough external vacuuming before performing a deeper teardown.
4. Why won’t my Comfort Zone tower fan turn on?
Start with the simplest possibilities: confirm the wall outlet works, inspect the cord and plug for damage, and check the integrated plug fuse.
Comfort Zone provides a fuse replacement procedure for the CZTFR1 series and specifies replacing the fuse only with an identical appropriate type and rating.
If the replacement fuse immediately fails again, do not continue replacing fuses repeatedly. That may indicate an internal electrical problem requiring qualified service.
5. Can I run the CZTFR1BK with the housing removed to see what is wrong?
That is not advisable.
Comfort Zone warns users not to operate the fan with blade guards or safety devices removed and identifies electrical shock, hot-surface, and fire risks associated with improper operation.
Complete the reassembly before performing operational testing.
Conclusion: Open the CZTFR1BK Methodically, Not Forcefully
The key to how to open a Comfort Zone tower fan model CZTFR1BK is knowing where the manufacturer’s instructions stop. Removing the pedestal is well documented: unplug the fan, remove the underside screws, release the cord, and reverse the original base-assembly process.
Going deeper requires more restraint. The manufacturer does not publish a complete CZTFR1BK housing teardown in the owner’s documentation I found, so do not trust generic instructions that claim an exact number or position of hidden case screws without confirming them on your particular fan.
For cleaning, start with the lowest-risk option: unplug the fan, vacuum the grilles thoroughly, brush away trapped lint, and wipe accessible surfaces. Only proceed to enclosure removal when there is a genuine reason to do so.
If you decide to continue, photograph every stage, keep screws organized, never force a resistant plastic panel, protect the wiring, and fully reinstall the housing before testing. That approach makes how to open a Comfort Zone tower fan model CZTFR1BK far safer—and greatly reduces the chance that a simple cleaning job turns into a broken fan.